“You should turn this into an audiobook.” If you’re a blogger or website owner with helpful content, then you might hear this advice a lot.
But like many creators, you may feel overwhelmed or unsure where to start, especially when it comes to selling audiobooks online.
I remember feeling intimidated by the technical side myself. But I was surprised by how easy it was to set up my own audiobook store once I found the right tools.
In this guide, I’ll walk you through the three simplest methods I’ve tested for selling audiobooks online, so you can skip the headaches and start reaching new listeners.
Ready to turn your blog or book into a profitable audiobook? Here’s how you can start selling audiobooks online in just a few simple steps.
Why Sell Audiobooks Online?
When it comes to sharing your knowledge or experiences online, there are plenty of options. You might create an online course, record a webinar, or even start a podcast.
But have you considered turning that information into an audiobook? In my experience, audiobooks are a fantastic way to package everything you want to say into a single, downloadable file that’s convenient for your audience.
Unlike with traditional print books, you don’t have to pay for the cost of printing and shipping when you’re selling audiobooks. And you don’t have to deal with physical storage or inventory management.
All of this means lower costs and bigger profits. In short, the audiobook market is a great place to make money online with WordPress.
Services like ACX make it easy to turn an eBook into an audiobook. And when you self-publish on ACX, your audiobook becomes available on Audible, Amazon, and Apple Books. But one downside is that you’re often sharing revenue with these platforms.
That’s why I recommend adding the audiobook to your own website. This way, you have control over the sales process and keep more of your earnings.
With that in mind, let’s look at a few simple ways you can start selling audiobooks from your own website. I’ll walk you through each method so you can find the one that works best for you:
Method 1. How to Sell Audiobooks With Easy Digital Downloads (Easiest)
If you want the fastest and simplest way to sell audiobooks from your WordPress site, Easy Digital Downloads (EDD) is my top pick. I recommend this method if you’re mainly focused on digital products and want an easy, straightforward setup.
EDD is perfect for authors, bloggers, or anyone who doesn’t want to deal with physical products or complicated store features. It keeps everything streamlined, so you can have your store up and running faster than with most eCommerce platforms.
If you want a beginner-friendly solution that grows with you as you add more digital products, this is the method to start with.
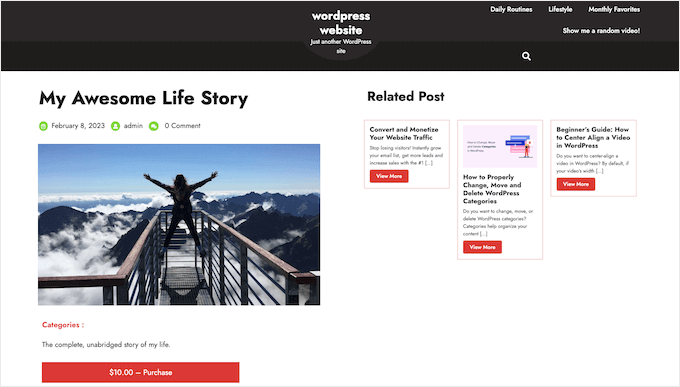
Unlike general eCommerce platforms, EDD focuses on the features you need to promote, sell, and distribute digital products easily.
☝ Important Note: The free version of EDD comes with everything you need to sell audiobooks online. However, if you upgrade to a premium plan, you’ll get more advanced features to scale your business, like additional payment gateways and reports.
Many of our partner brands, including OptinMonster and WPForms, use Easy Digital Downloads to sell our software. It’s the same tool we rely on, so we know firsthand how powerful it is for selling digital goods.
You can learn about our experiences using the plugin in our detailed Easy Digital Downloads review.
If you’re using SiteGround as your hosting provider, then EDD comes pre-installed on their EDD plan. That means you can start selling immediately without additional setup.
But if you’re with a different hosting provider, that’s not a problem. You can easily install and activate the Easy Digital Downloads plugin.
Need help? Check out our guide on how to install a WordPress plugin.
Step 1: Set Up Your Online Store
Once you activate the plugin, go to Downloads » Settings in the WordPress dashboard.
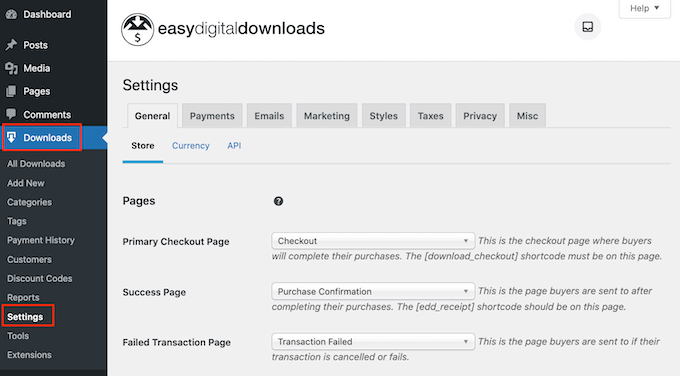
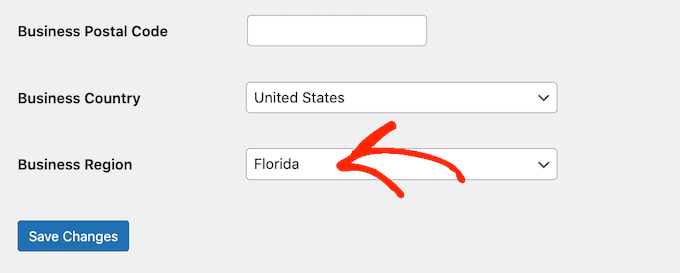
Even though you’re selling digital products, you’ll need to set your store’s location.
This helps EDD auto-fill some fields in the order form, improving the customer experience. It can also help with tax calculations if you configure tax rates manually or use a service like TaxJar.
Simply open the ‘Business Country’ dropdown and select your country.
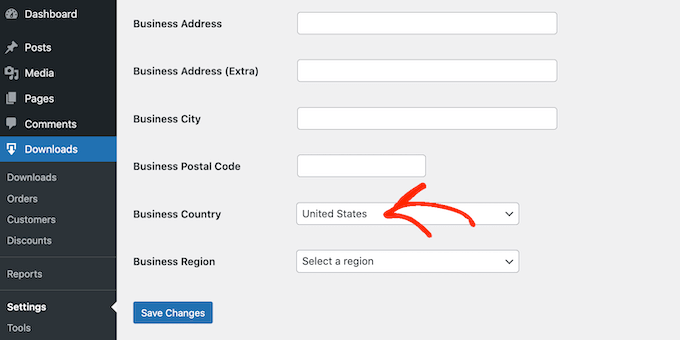
Then, choose your region in the ‘Business Region’ field.
Don’t forget to click the ‘Save Changes’ button to store your settings.
Step 2: Configure Your Payment Gateways
Next, you’ll want to set up payment gateways so you can accept credit card payments.
Go to the ‘Payments’ tab and make sure the ‘General’ tab is selected.
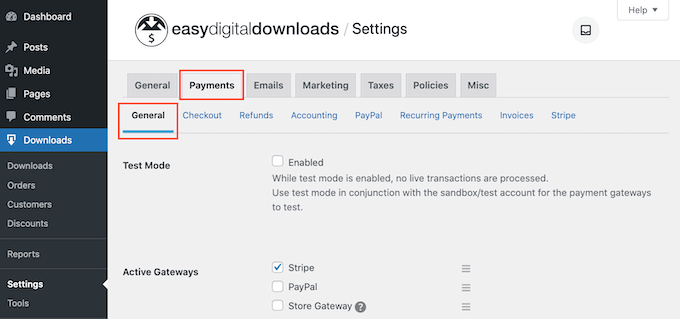
In the ‘Active Gateways’ section, check the boxes next to the gateways you want to offer.
I like using Stripe because it accepts credit cards, Apple Pay, and Google Pay.
If you add more than one gateway, make sure to select a default – Stripe is often a good choice, since it allows you to accept many different forms of payment.

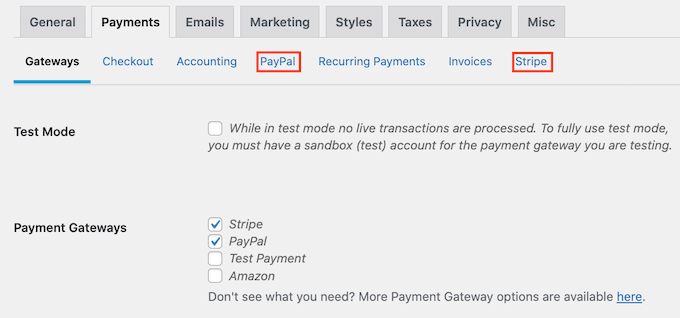
After that, click the ‘Save Changes’ button, and you’ll see new tabs to configure each payment method.
The setup process varies slightly for each gateway, but EDD provides guidance along the way.
Step 3: Create a Digital Product
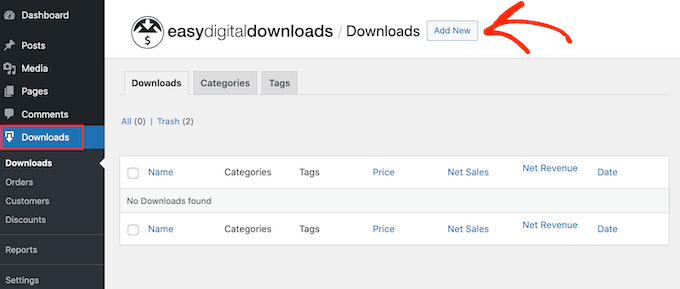
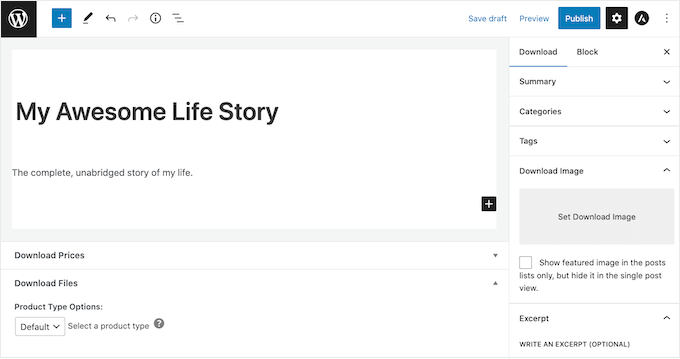
Now you’re ready to add your audiobook. Go to Downloads » Downloads in the left-hand menu, then click the ‘Add New’ button.
Enter a title in the ‘Enter download name here’ field. This will be the name of your audiobook as it appears to customers.
In the main content area, I also recommend adding a detailed description. This is a great place to share what makes your audiobook special and why you think listeners will find it valuable.
If you’re selling multiple audiobooks, then consider organizing them in your online store using categories and tags. This helps customers find related titles easily.
You can create new categories and tags in the ‘Categories’ and ‘Tags’ panels.
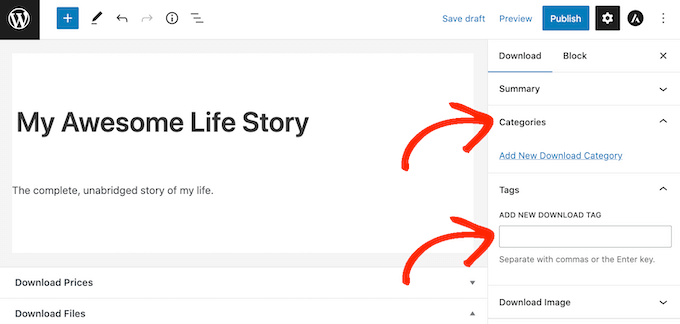
For more information, see our step-by-step guide on how to add categories and tags for WordPress pages.
Next, set the price in the ‘Download Prices’ section by entering the amount in the price field.
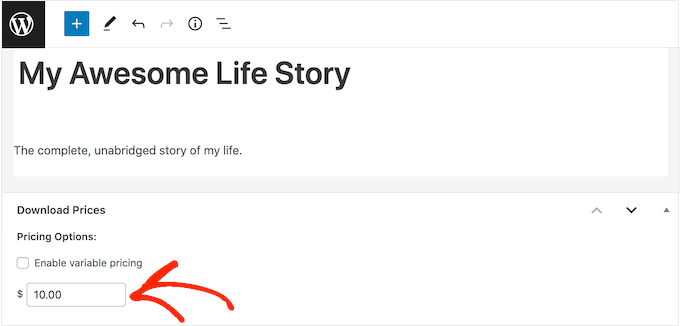
Most audiobooks sell for anywhere from $5 to $25, depending on length and topic. You can test what works best for your audience.
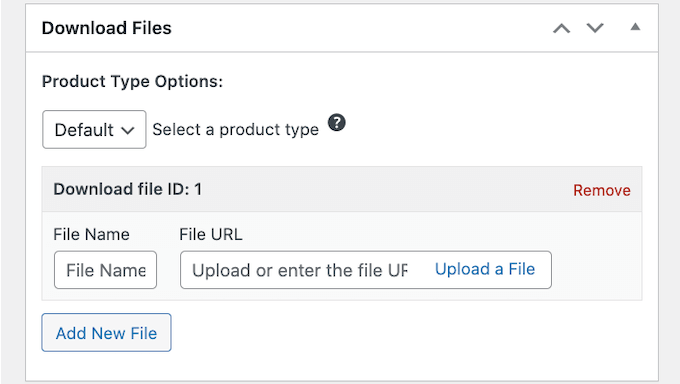
Then, you’ll need to upload your audiobook file. WordPress supports formats like MP3, OGG, WAV, and m4a. You can upload a single file or a zip folder containing multiple chapters if needed.
See our guide on how to allow additional file types for additional information.
Now, just click ‘Upload a File’ and select your file from the media library or upload a new one.
Finally, add a cover image in the ‘Download Image’ section. A captivating cover can grab the attention of potential buyers.
If you don’t already have a cover, then you can create one using web design software such as Canva or an alternative software for creating graphics.

When everything looks good, click the ‘Publish’ button to make your audiobook live.
Step 4: Help Visitors Discover Your Audiobook
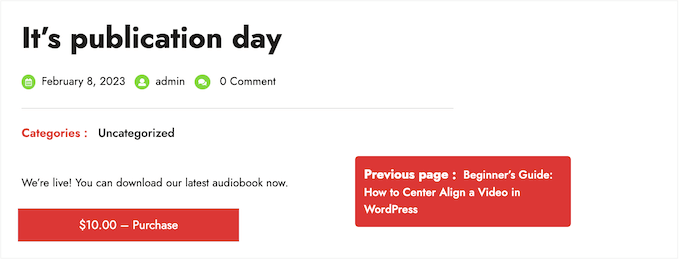
Now that your audiobook is live, you’ll want to make sure visitors can find it. You might add it to your site’s menu, feature it on your home page, or include it in a dedicated sales page.
To get the link to your audiobook’s product page, go to Downloads » Downloads and click ‘Edit’ under your audiobook.
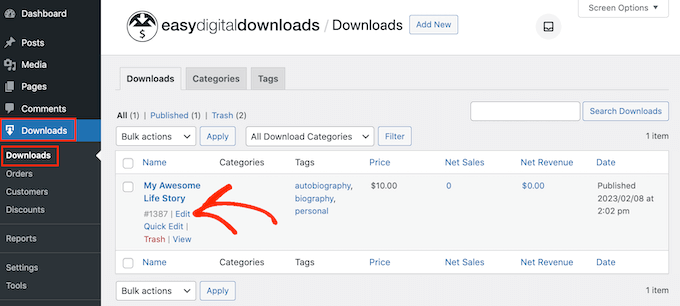
You’ll find the URL below the title. Use this link wherever you want to promote your audiobook.
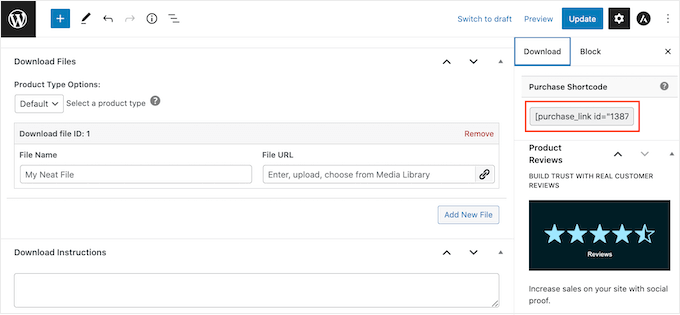
EDD also provides a ‘Purchase Shortcode’ for your audiobook. A shortcode is a small snippet of code that adds a feature to your post or page, like a buy button, without needing any coding skills.
To find it, scroll to the ‘Download’ settings section on your audiobook’s edit page.
Copy the shortcode and paste it into any post, page, or widget area.
For more information on placing the shortcode, see our guide on how to add a shortcode in WordPress.
Step 5: Create Branded Emails
After a customer buys your audiobook, Easy Digital Downloads automatically sends them a purchase receipt email that contains the secure download link.
I recommend personalizing this email because it’s a great opportunity to make your brand look more professional and improve the customer experience.
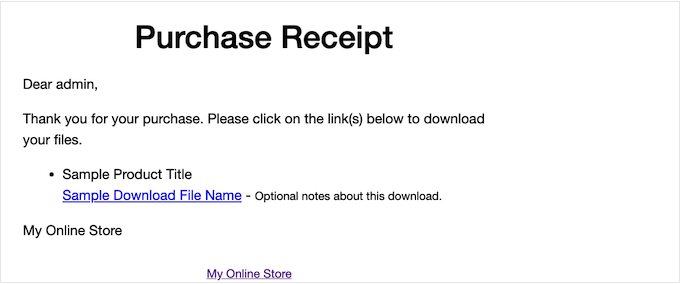
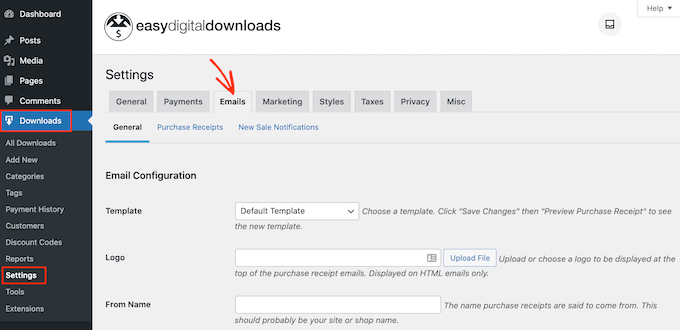
To personalize the email, navigate to Downloads » Settings and click on the ‘Emails’ tab.
Here, you can add your logo, adjust the colors, and modify the content to align with your branding.
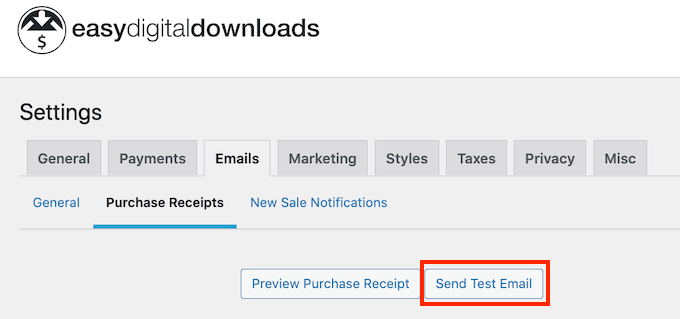
You might want to send a test email to ensure everything looks right.
Click on the ‘Send Test Email’ button, and EDD will send a sample to your admin email address.
Once you’re satisfied with your email settings, click the ‘Save Changes’ button.
This is all you need to start selling audiobooks online. However, Easy Digital Downloads has lots of more advanced features that can help you sell audiobooks.
For more information on Easy Digital Downloads, please see our guide on how to sell digital downloads on WordPress.
Method 2. How to Sell Audiobook Memberships (Best for Recurring Revenue)
If you have a collection of audiobooks (or plan to release new titles regularly), creating a membership site is the best way to build steady, recurring income and a loyal community around your content.
I recommend this approach if you want to offer listeners unlimited access to all your audiobooks for a monthly or yearly fee, similar to the Netflix model.
I’ve found that memberships work especially well for authors with a backlist, course creators, or anyone looking to add fresh content over time. If you like the idea of predictable income, this is a great option.
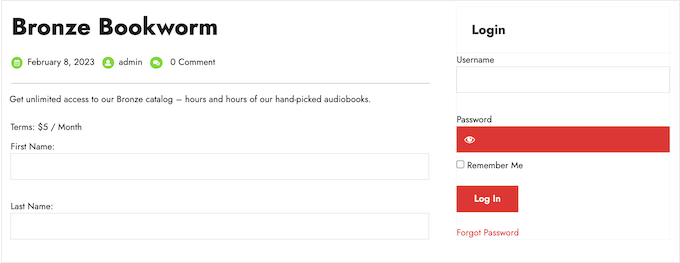
Instead of offering individual audiobooks, you can provide members with unlimited access to your entire collection for a recurring fee.
To set up a membership site, I recommend using MemberPress, which is the best WordPress membership plugin.
At WPBeginner, we even used it to build our free video website, where we offer free educational materials to WordPress enthusiasts. You can check out our full MemberPress review for more information about the tool.
Although we haven’t monetized our own membership content, we’ve seen firsthand how MemberPress allows you to accept payments, create unlimited membership levels, and restrict access to content based on those levels.
But here’s the exciting part: MemberPress now offers a Downloads Add-on. This feature lets you manage and sell downloadable files, like audiobooks, while keeping them exclusive to your members.
☝ Important Note: MemberPress is a premium tool, but you’ll only need the ‘Basic’ plan to get all the features you need, including the Downloads Add-on.
Now let’s see how you can easily start selling audiobooks with MemberPress.
Step 1: Install and Configure MemberPress
First things first, you’ll need to install and activate the MemberPress plugin. If you’re unsure how to do this, then you can follow our step-by-step guide on how to install a WordPress plugin.
After you activate the plugin, head over to MemberPress » Settings in your WordPress dashboard. Here, you can configure the basic settings for your membership site.
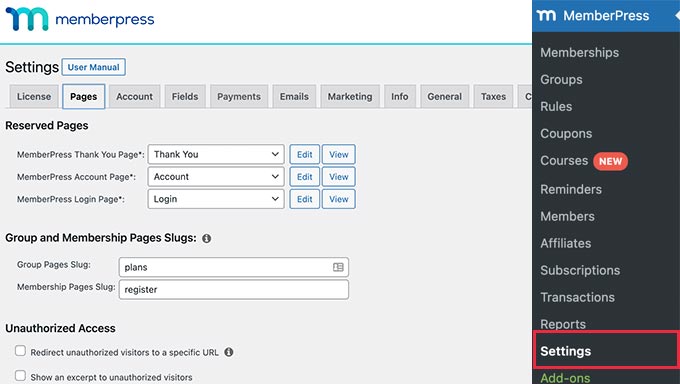
Make sure to fill in your business information and adjust any preferences to suit your needs.
Step 2: Add a Payment Gateway
Next, you’ll want to set up a payment gateway so you can accept payments from your members.
Navigate to the ‘Payments’ tab within the MemberPress settings and click on the ‘Add Payment Method’ button.
From the ‘Gateway’ dropdown, select your preferred payment method. MemberPress supports several options, including PayPal, Stripe, and Authorize.net.
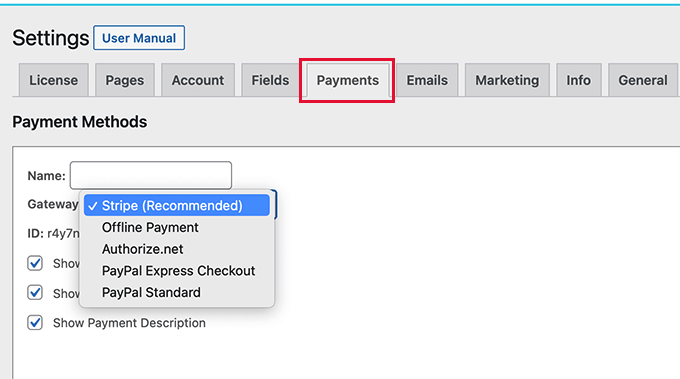
I like Stripe because it allows members to pay with credit cards, Apple Pay, and Google Pay.
Then, you’ll need to enter the required credentials for your chosen gateway. For Stripe, this would be your API keys. Don’t forget to click ‘Update Options’ to save your payment settings.
💡Related Post: How to Accept Payments with Stripe in WordPress
Step 3: Create Your Membership Levels
Now it’s time to create your membership levels, which are the subscription plans that give members access to your audiobooks.
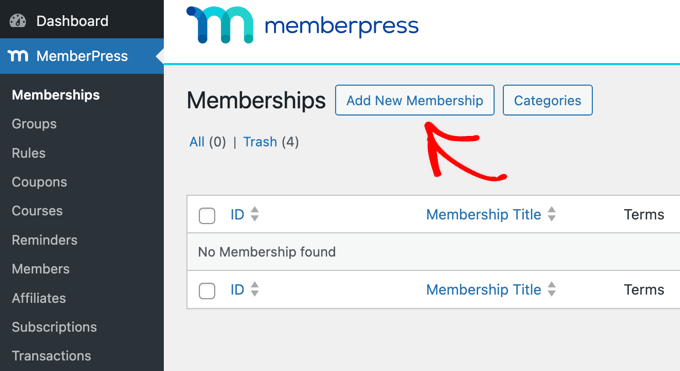
To get started, go to MemberPress » Memberships and click ‘Add New Membership.’
Here, you’ll need to enter a name for your membership level, like ‘Audiobook Monthly Pass’ with a recurring monthly fee, or ‘Premium Audiobook Access’ with a higher one-time fee.
In the editor, I recommend writing a short description of what members will get with this plan. This helps customers understand the value of signing up.
Under the ‘Membership Terms’ section, set the price for the membership. You’ll also need to choose the ‘Billing Type’ – whether it’s a one-time payment or recurring.
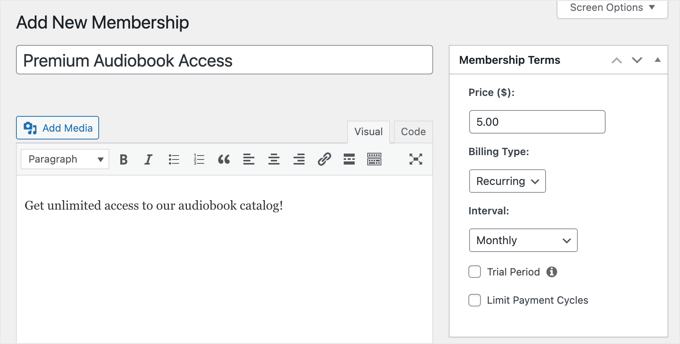
If it’s recurring, you need to set the ‘Interval,’ such as monthly or yearly. For example, you might charge $5.00 per month for unlimited access to all audiobooks.
You can also set an ‘Expiration’ if needed, but for ongoing memberships, you might leave this blank.
In the ‘Membership Options’ box below, you can customize permissions and welcome messages.
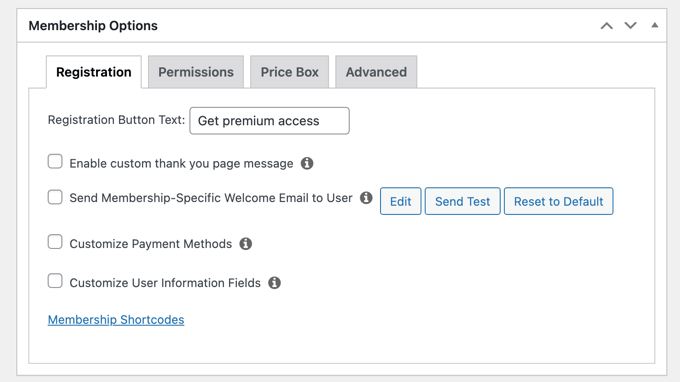
Once you’re happy with the setup, click the ‘Publish’ button. Repeat these steps if you want to create multiple membership levels.
Step 4: Install the MemberPress Downloads Add-on & Upload Your Audiobooks
To manage and protect your audiobook files, you’ll want to use the MemberPress Downloads Add-on.
It lets you easily upload and organize your audiobooks while ensuring that only members with the appropriate access can download them.
To enable it, go to MemberPress » Add-ons, find the ‘Downloads’ Add-on, and click the ‘Install Add-on’ button.
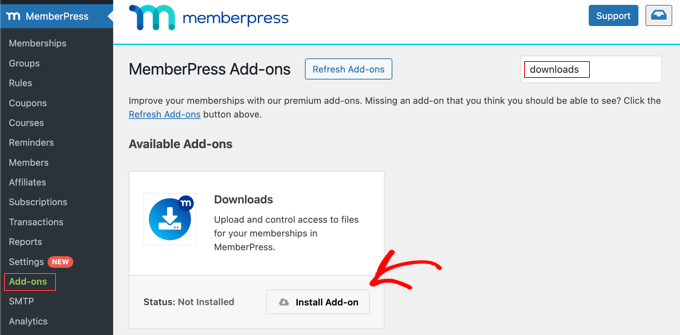
The Add-on will be automatically activated once it’s installed.
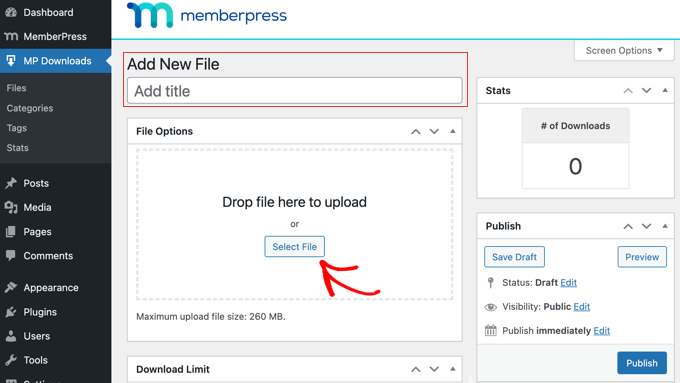
With the Downloads Add-on installed, you can start uploading your audiobooks. Navigate to MP Downloads » Files and click ‘Add New File’ to create a new downloadable item.

On the next screen, you can add a title for your audiobook. At the bottom of the page, you will also find a place where you can add a description.
Then, click the ‘Select File’ button to upload your audiobook file. If your audiobook is split into chapters, then you can upload multiple files.
You can also use categories and tags to organize your audiobooks, which makes it easier for members to find what they’re looking for.
Alternatively, if you only want to restrict access to some files for paying members, you can add a ‘premium’ tag to easily identify those files.
This level of organization can enhance the user experience and encourage members to explore more of your content.

Once you’re done, click the ‘Publish’ button to make the audiobook available on your site’s backend. However, it won’t be accessible to members until we set up the access rules.
Step 5: Create an Audiobook Page
To allow paying members to download your audiobooks, your membership site will need a page where they can be accessed.
For example, you can create a page titled ‘My Audiobooks’ that displays a list of your audiobooks. In the next section, you will set up access rules so that only members with a subscription can download files from it.
See our guide on how to create a custom page in WordPress for detailed instructions.
After adding the page title and a brief explanation of its purpose, you can add a list of your audiobooks by inserting this shortcode:
[mpdl-file-links]
Alternatively, you can list all downloads with a specific file category using the shortcode [mpdl-file-links category="your-category-slug"].
Or, you can list the downloads with a specific tag with this shortcode instead: [mpdl-file-links tag="your-tag-slug"].
You can also optionally display the file description along with the filename by adding show_description="true" at the end of the shortcode, like this:
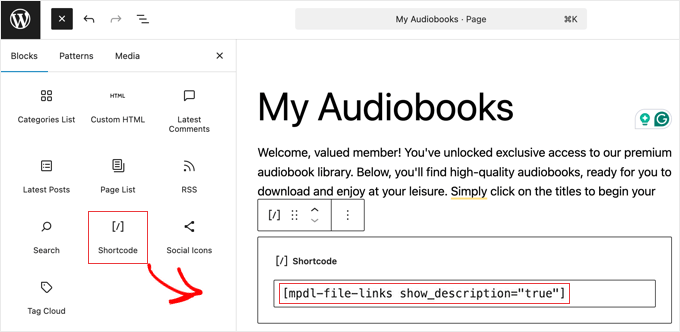
For detailed instructions, see our beginner’s guide on how to add a shortcode in WordPress.
Here’s an example of what a very simple audiobooks page might look like for your members.
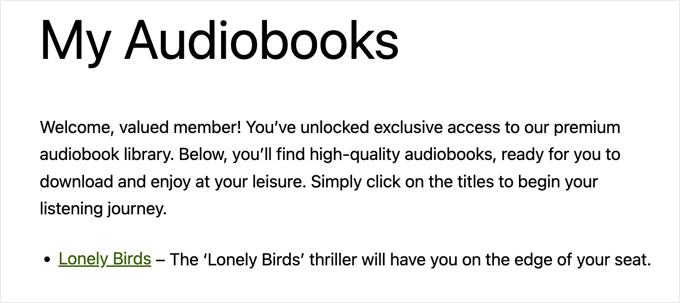
Your members can download an audiobook by clicking its title. And if you upload more audiobooks in the future, they will automatically appear on this page.
Once you have created the download page for your audiobooks, you’re ready to set up access rules.
Step 6: Set Up Access Rules to Protect Your Audiobooks
Access rules allow you to allow or restrict access to your audiobooks based on the user’s membership plan.
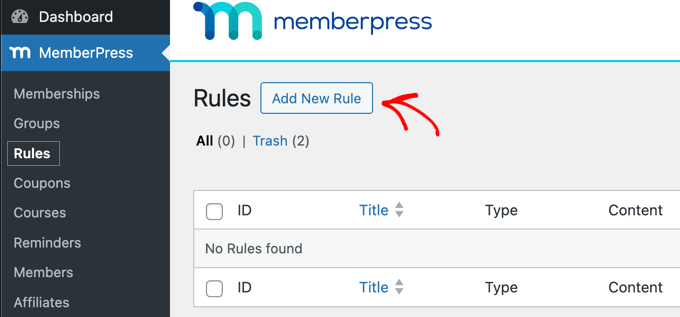
To get started, go to MemberPress » Rules in your dashboard and click the ‘Add New Rule’ button.
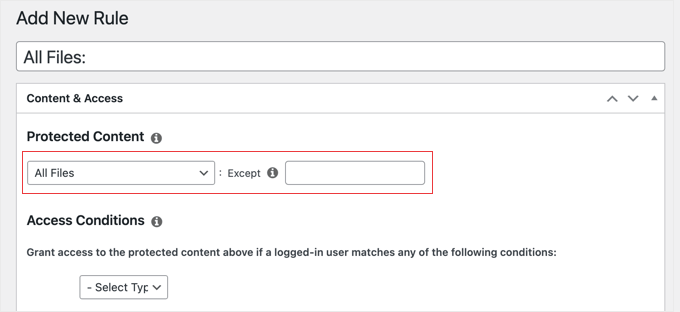
Under the ‘Protected Content’ section, you can choose what kind of content to restrict.
For example, if you want to protect all of the files you uploaded to MP Downloads, simply select ‘All Files’ from the drop-down menu.
Alternatively, if you only want to protect audiobooks that have a specific tag, you would select ‘Files with File Tag’ from the drop-down menu and type the specific tag (for example, ‘premium’) in the next field.
After that, you need to look at the ‘Access Conditions’ section.
Simply choose the membership level that can access this content. If there are several membership levels that should be able to access the files, simply click the ‘+’ button and add a new membership.
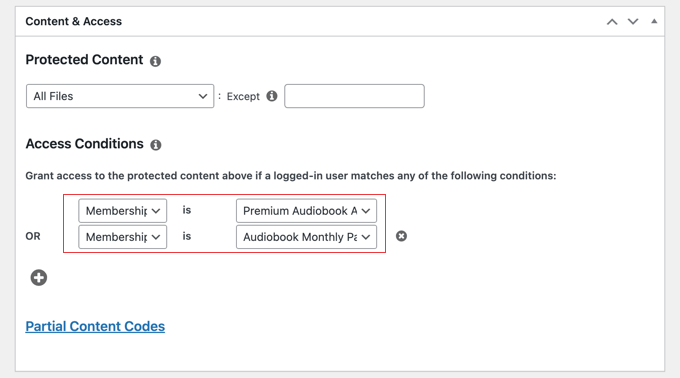
Make sure you click the ‘Save Rule’ button at the top right of the page to save and activate the rule.
This makes sure that only members who have paid for the right plan can see the page and download your audiobooks. When non-members click the link, they will see a message that they need to join before they can download the files.
Now, you may prefer that non-members can’t view or access the download page as well. In that case, simply create a new rule where you select ‘Single Page’ from the drop-down menu.
Then, in the next field, start to type in the name of your downloads page and select it from the list.
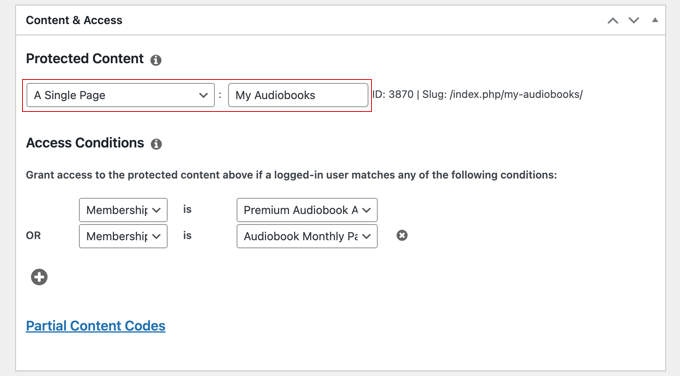
Once you’re done, just click the ‘Save Rule’ button at the top right of the page to save your settings. Now, only authorized members will be able to access the protected audiobook download page.
Step 7: Add Membership Forms to WordPress
Now that your exclusive memberships are set up and your content is protected, the final step is to give visitors an easy way to sign up for a membership and for existing members to log in.
MemberPress automatically creates registration pages for each membership level. I recommend adding them to your navigation menu.
This gives people easy access to your membership sign-up pages, making it convenient for potential members to join.
The way you do this depends on whether you are using a classic theme or a block theme.
For example, with a classic theme, you can go to Appearance » Menus. In the ‘Add menu’ items section, click on ‘Memberships.’
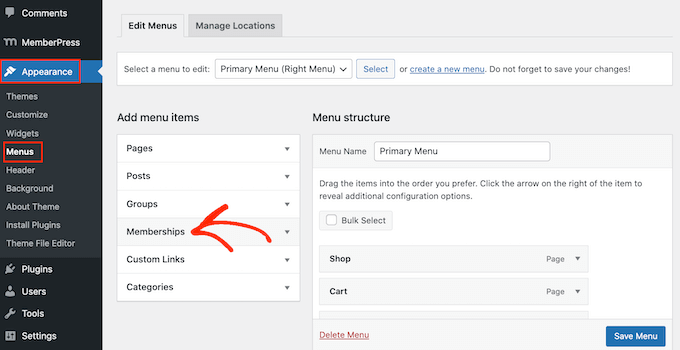
If the MemberPress plugin is working correctly, you’ll see the registration pages for your membership levels listed.
Check the boxes next to the registration pages you want to add to your menu, then click the ‘Add to Menu’ button.
You can arrange them as you see fit and then click the ‘Save Menu’ button.
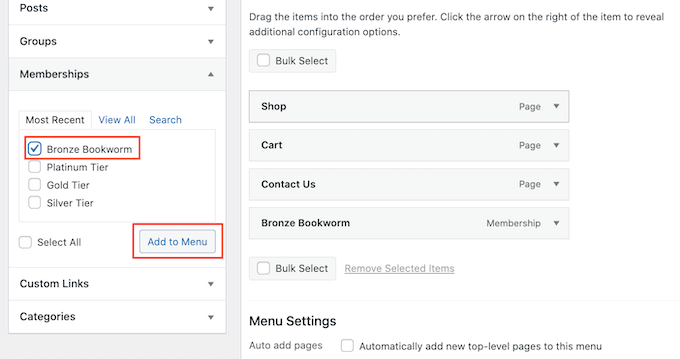
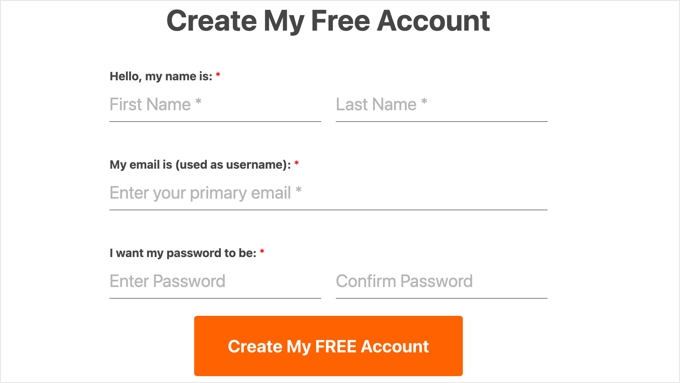
Now, when someone visits that new menu link on your site, they’ll see the clean and simple registration page that MemberPress created for that membership level.
This is where new users can sign up. It will look something like this:
The process is a little different for block themes. We cover both methods in our beginner’s guide on how to add a navigation menu in WordPress.
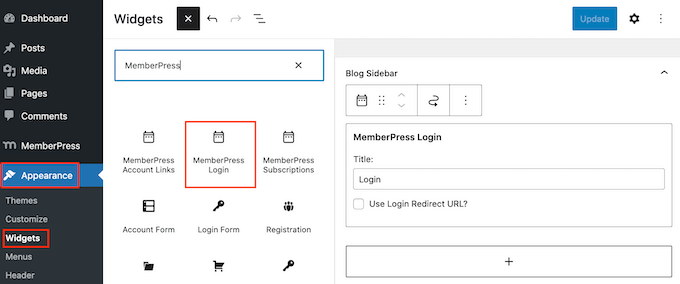
You can also add a login widget to your site that allows members to sign in from any page.
With a classic theme, you can add the ‘MemberPress Login’ widget from the Appearance » Widgets page.
To learn more, see our guide on how to add and use widgets in WordPress.
With a block theme, you add the ‘Membership Login’ block from the Appearance » Editor page.
We show you how step-by-step in our beginner’s guide to WordPress full site editing.
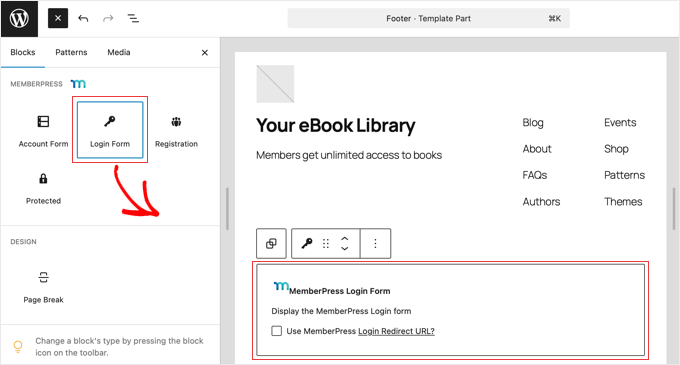
That’s all it takes to set up your audiobook membership site with MemberPress. You’re now ready to offer recurring subscriptions, build a loyal community, and generate predictable income.
For more detailed instructions and ideas to grow your site, you can see our ultimate guide to creating a WordPress membership site.
Method 3. How to Sell Audiobooks With WooCommerce (Best For Online Stores)
Already running an online store with WooCommerce? Or maybe you want to sell audiobooks alongside physical books, merchandise, or other products.
WooCommerce is my top recommendation for anyone who wants a single, unified storefront for both digital and physical items.
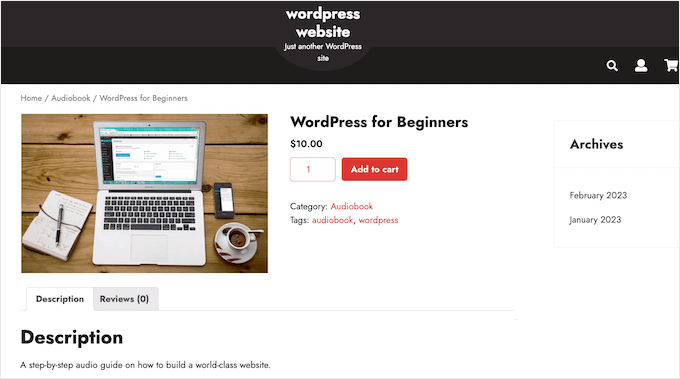
This method is great if you want advanced store features, like coupons, product bundles, reviews, or integrations with shipping and fulfillment services.
Before you can add your audiobook, you first need to make sure WooCommerce is set up correctly to handle digital products. I’ll walk through those settings now.
Step 1: Setting Up WooCommerce for Digital Products
To start selling audiobooks, you’ll need to configure WooCommerce to handle digital downloads.
To get started, head over to WooCommerce » Settings in your WordPress dashboard, then click on the ‘Products’ tab. From there, select ‘Downloadable products.’
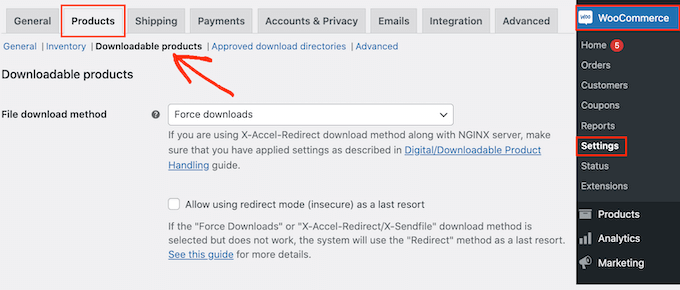
In the ‘File download method’ dropdown, I recommend choosing ‘Force downloads’.
This option makes sure your audiobooks are delivered securely to customers without exposing the direct file links. This helps prevent unauthorized sharing and protects your hard work.
But one downside is that with very large files, ‘Force downloads’ might cause timeouts, especially if your hosting resources are limited.
That’s because ‘Force downloads’ works by loading the file through your server. For audiobook files larger than 100MB, especially on shared hosting, this can cause timeouts.
If you find that customers are having trouble downloading very large audiobook files, then you may need a more powerful download method.
In that case, you may want to use a cloud storage or CDN. A CDN (Content Delivery Network) stores your audiobook files on servers around the world, so users can download them faster and more reliably.
Some hosting providers offer CDN integration or optimized file delivery systems, which can improve speed and reliability for large audiobook downloads.
If you’re unsure, reach out to your host’s support team for help.
You might also want to enable the ‘Allow using redirect mode (insecure) as a last resort’ option.
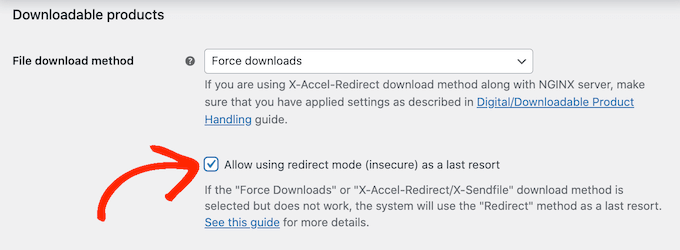
While this method is less secure, it may be a practical fallback to avoid frustrating customers if other methods fail.
Step 2: Configuring Access Restrictions
Next, consider whether you want customers to log in before downloading the audiobook.
Requiring a login helps you collect customer data and generate leads, but it might also create friction in the purchasing process. I have found that allowing guest checkout can increase sales, so it’s worth weighing the pros and cons for your store.
To make this decision, either enable or disable the ‘Downloads require login’ checkbox.

By default, WooCommerce grants customers access to downloadable products immediately after payment.
If you’d prefer to approve orders manually or ensure payment has cleared, then you can uncheck the ‘Grant access to downloadable products after payment’ option.
This way, customers will receive the download link once the order status is marked as Completed.
You can also decide how the file is presented to customers. If you’d like the audiobook to open directly in the browser (useful for short samples or previews), then you can check the ‘Open downloadable files in the browser’ option.
Otherwise, the file will download to the customer’s device. I find this option is ideal for full-length audiobooks.
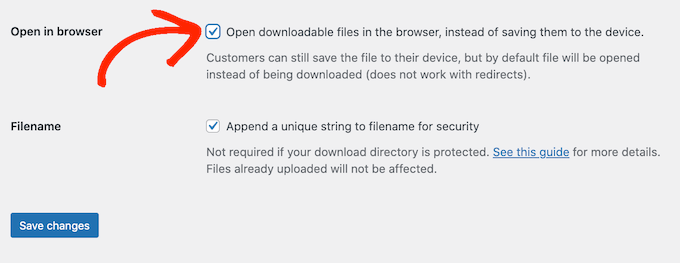
Don’t forget to click ‘Save Changes’ when you’re done configuring these settings.
Step 3: Adding Your Audiobook to WooCommerce
Now it’s time to add your audiobook as a product. Navigate to Products » Add New.
Start by giving your product an engaging title and a detailed description that highlights what makes your audiobook special.
I recommend including information that will connect with your target audience, as this can help convince them to make a purchase.
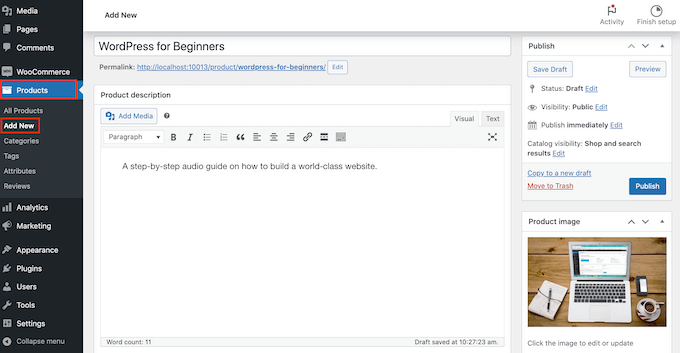
In the ‘Product Data’ section, check both the ‘Virtual’ and ‘Downloadable’ boxes.
This tells WooCommerce that this product doesn’t require shipping and includes a file for customers to download.
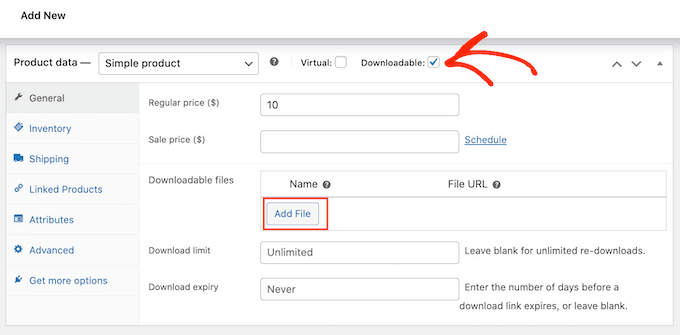
Under the ‘General’ tab, set your regular price.
Audiobooks typically cost between $5 and $25, depending on their length and subject matter.
Then, in the ‘Downloadable files’ section, click the ‘Add File’ button. You can upload your audiobook file or select it from your media library.
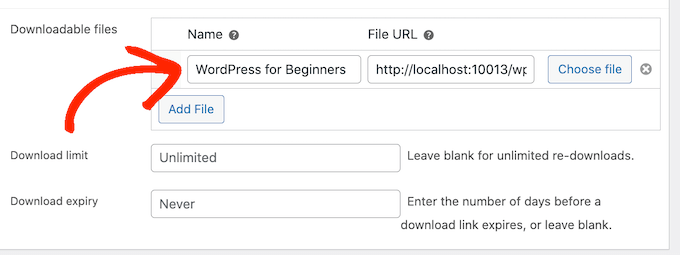
Be sure to give the file a clear name so customers know what they’re downloading.
If you want to limit the number of times a customer can download the audiobook, then you can enter a number in the ‘Download limit’ field.
Similarly, you can set a ‘Download expiry’ by entering the number of days before the download link expires.

I recommend leaving these fields blank to allow unlimited downloads with no expiration. This provides a better customer experience because they don’t have to worry about losing the file or needing to download it again to a new device in the future.
Adding a captivating product image, like your audiobook’s cover art, can attract more attention. I like to use high-quality images to make my products stand out.
Once you’ve filled in all the details, simply click the ‘Publish’ button to make your audiobook live in your store.
Customers can now find your audiobook, add it to their cart, and purchase it just like any other product. After they complete their purchase, they will get a secure download link based on the settings you configured.
Discover More Digital Products You Can Sell Online
I hope this article helped you learn how to sell audiobooks online. Want to make passive income by selling other types of digital downloads? You can check out these tutorials below:
- Most Popular Digital Products You Can Sell Online
- How to Create and Sell Ebooks in WordPress from Start to Finish
- How to Sell Music Online in WordPress (Step by Step)
- How to Sell Videos Online With WordPress (Step by Step)
- How to Sell Photos Online (Beginner’s Guide)
- How to Sell Canva Templates in WordPress (Beginner’s Guide)
- How to Sell Digital Art and Graphics Online (The Easy Way)
- How to Sell Fonts Online with WordPress (Step by Step)
- How to Sell Excel or Google Spreadsheets in WordPress
If you liked this article, then please subscribe to our YouTube Channel for WordPress video tutorials. You can also find us on Twitter and Facebook.


Jiří Vaněk
This article came in handy exactly when I was dealing with a similar issue using Easy Digital Downloads. I have several books on my website, and now I’ve learned to work with artificial intelligence, which has converted my books into spoken form very effectively. This gives me two formats of the book: written and now also audio. It’s amazing how far technology has come. That’s why I was looking into selling the audiobook as well. Thank you for sharing these types of insights, as I now don’t have to make mistakes that I would have typically made when selling these products. I have a comprehensive guide on how to do it correctly.
Mrteesurez
Thank you for introducing me to ACX! It’s a fantastic platform for selling audiobooks, especially with its integration into Audible and iTunes.
When it comes to selling audiobooks online, WooCommerce is my preferred method because of its flexibility and the ability to handle various types of products. Plus, I only deal with charges from payment gateway, which is a huge bonus.
However, for purely digital products like audiobooks, Easy Digital Downloads (EDD) is also a great option. It’s lightweight and designed specifically for digital sales, making it easier to manage downloads and customers without the extra complexity. Both are solid choices, but for me, WooCommerce is better especially if you need more integrations.